If there has been any issues with a payment taken for the POS, you may at some point need to refund or reverse it. For example, a customer decides to pay the check with cash instead of it being charged to the room, or vice versa. Whatever the reason you need to reverse a payment, the process is simple.
Note: You should already be on the Restaurant Check screen. (This page is where you will be taken when you have opened a check for any table or point of service within the Point of Sale (POS) section of Skyware Systems. If not, you can reach it from the Point of Sale (POS) Main menu by clicking on the Open Checks command and selecting the check in question).
To REFUND or REVERSE a payment, you will have already taken a payment. (For more details see How To Take a Payment in your Point of Sale (POS)).
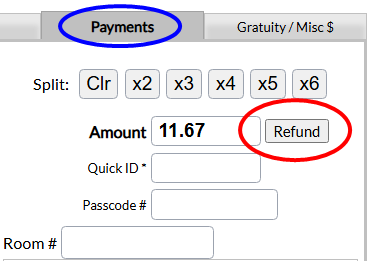
You should have the Payments tab open.
Click on the "Refund" button, next to the Amount field.
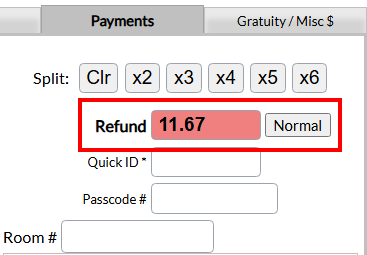
The word Amount will change to Refund, and the "Refund" button will now become the "Normal" button.
Note: This will also cause the amount field to become pale red, in warning that any amount entered in the field will now be refunded rather than charged.
Type the amount to refund (remove from the payment total) into the amount box for the payment already taken and click post.
You may also need to input your Quick ID, depending on the type of charge.
Note: As the amount to be reversed is manually typed in, it can therefore be for all or part of any charges. Thus it may be the total paid (which is shown in the field, and therefore does not need to be altered), or may be any amount you wish to have refunded (for example, the guest decides to pay separately for their drinks and wants the amount removed from what has been charged).
Once posted, the check will show BOTH charges and reversals.
This can be done for ANY payment type.
Note: You may now continue to take any further payment as usual.
A refund or reversal for a discount or a gratuity charge is also done this way.
Make sure you have the Gratuity/Misc $ tab open.
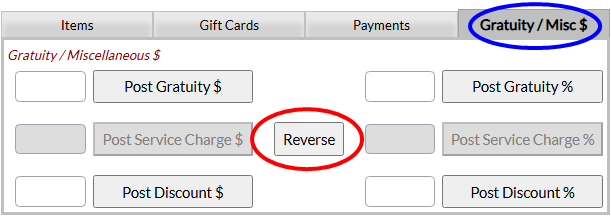
Click the "Reverse" button in the center of the tab.
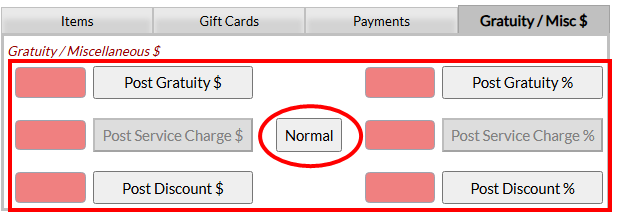
The "Reverse" button will now become the "Normal" button, and the amount fields will again become pale red, in warning that any amount entered in the field will now be refunded rather than charged.
Put the desired amount into the correct box and post.
Note: Again as the amount to be reversed is manually typed in, it can therefore be for all or part of any charges paid.
For example, if someone charged the check to the room, adding a gratuity, and then decides to leave the gratuity as cash instead.
After the check has been closed:
You cannot refund or reverse a payment on a check that is closed. If the reversal needs to be performed on a check that has already been closed, the check first needs to be re-opened from the Main Point of Sale (POS) menu - Overview before it can be altered.
This is done by clicking on the Check History command, selecting the relevant check on the section on the left, then in the right-hand section clicking the tab in the tool bar called Go to the Selected Check. See View Check History for more details. Then once the check is open again, proceed as previously outlined above.
Date Updated May 19, 2026